

CLI reference.
Install the printing engine, connect an ESC/POS receipt printer, and work directly from your terminal.
In this guide

Install and first print
You'll need a source checkout of the Slipbridge CLI, a Rust toolchain, and an ESC/POS receipt printer connected by USB or network. The public repository is not yet available, and public packages are not a supported install path.
1Install the CLI
From the CLI repository directory, build and install Slipbridge. Then check that local USB access and rendering are working.
 Terminal
cargo install --path . --force
slipbridge doctor2Find your printer
Switch the printer on, load paper, and connect it to your computer or local network.
slipbridge printers list
Copy the printer ID from the result. The examples below use
tcp://epson-m30.local:9100; replace it with your
printer's actual address. See
connection options if it doesn't
appear.
3Print the sample
Download ticket.md, open a terminal in its folder, and run this command with your printer's address.
slipbridge print ./ticket.md \
  --printer tcp://epson-m30.local:9100 \
  --paper 80mm
This sends a checklist to the printer. For a narrower roll, use
--paper 58mm. You can also
preview the output before using any
paper.
Connect a printer
Slipbridge supports ESC/POS receipt printers. The verified hardware is an Epson TM-m30II-H over TCP. Other models need to support the same printing protocol; dedicated label printers are not currently supported.
Network
 Network
Put the printer and your computer on the same network. Use the printer's hostname or IP address, usually on port 9100.
tcp://epson-m30.local:9100
USB
 USB
USB
Connect with a USB cable. Use the USB printer ID returned by discovery, including bus and address if supplied.
usb://04b8:0e15
You can inspect the selected printer or send a small test receipt:
slipbridge printers inspect \
  --printer tcp://epson-m30.local:9100

slipbridge printers test \
  --printer tcp://epson-m30.local:9100
printers test uses paper. doctor checks
the local environment but does not test a TCP connection.
Files and previews
Pass a file to print. Slipbridge detects the input type
from its extension, lays out the content, and prepares it for
thermal printing.
| Content | Files | Good for |
|---|---|---|
| Markdown | .md |
Recipes, headings, lists, checklists |
| Plain text | .txt .json |
Quick notes and simple tickets |
| Images | .png .jpg .jpeg .webp .gif |
Logos and prepared graphics |
Markdown task lists use - [ ] for an empty box and
- [x] for a checked box. Boxes are drawn into the
printer image, and wrapped text stays aligned beneath the task.
Literal brackets and numbered lists are preserved.
Read content from another command
Use - for stdin. It defaults to plain text; specify
--type markdown or --type image for other
content.
printf 'Hello from Slipbridge\n' | slipbridge print -
cat ./ticket.md | slipbridge print - --type markdown
Text input is limited to 128 KiB, image files to 5 MiB, and the final receipt raster to 20,000 rows.
Print an image
Images are fitted to the printable width and converted to black and white. Use a high contrast image for a clear result.
slipbridge print ./logo.png \
  --printer tcp://epson-m30.local:9100 \
  --paper 80mm
Download an example image. To override automatic detection, add --type image,
--type text, or --type markdown.
Preview before printing
The render command writes the final black-and-white
raster without contacting a printer. Use the same input, paper
width, and font settings as your print.
slipbridge render ./ticket.md \
  --output preview.png \
  --paper 80mm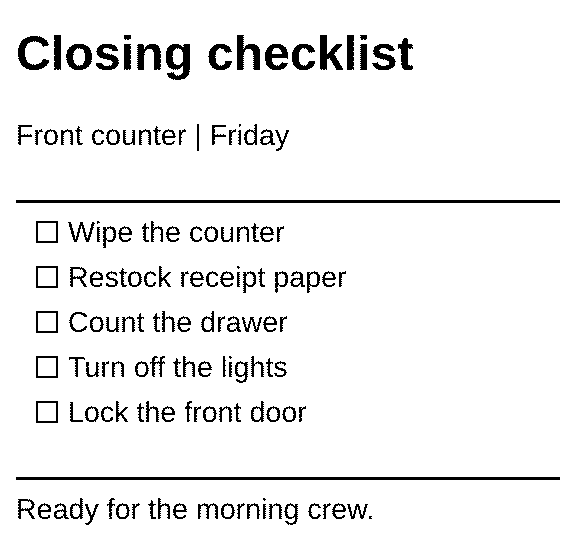

Exact PNG output
Every prepared print job saves a PNG of the actual raster sent to
the printer. Export a copy with --output, or find it in
the job's JSON result.
slipbridge print ./ticket.md --output ticket.png --json
slipbridge jobs inspect --job <job-id> --json
The artifact object includes a local path, pixel
dimensions, file size, and SHA-256 hashes of both the PNG and the
ESC/POS payload. The PNG is built from the final dithered pixels,
including byte-width padding. It represents one copy, with copy
count and delivery status recorded separately.
The image records what Slipbridge prepared for the printer. It cannot show a paper jam, fading, or a missing roll. A successful send confirms transport, not that paper exited. Prepared images remain available after a failed send.
Local artifacts follow the queue's seven-day terminal retention. Keep an exported copy for longer storage. When connected to the Slipbridge web app, the same PNG is uploaded before printing and saved with that attempt's history.
Printer settings
Select a default printer once. A saved name such as
epson also lets you address it without repeating its
endpoint. These settings stay on this computer.
slipbridge printers use tcp://epson-m30.local:9100 \
  --name epson --paper 80mm

slipbridge print ./ticket.md
slipbridge print ./ticket.md --printer epson
Without --printer, printing uses the saved default.
Explicit paper and driver flags override that endpoint's saved
settings.
| Option | Use |
|---|---|
--paper 58mm |
Use a 58 mm roll (80 mm is the default). |
--copies 2 |
Print two copies of the same file. |
--no-cut |
Leave the paper uncut at the end of the job. |
--json |
Return structured output for your script or agent. |
See saved settings with
slipbridge printers defaults show --printer
              <printer-id>
, or use slipbridge print --help for the installed
version's full options.
Agents and automation
An agent that can write files and run shell commands can use Slipbridge. Install it on a computer with access to the printer, then give the agent the printer address and paper width.
Use Slipbridge to print on
tcp://epson-m30.local:9100 with 80 mm paper. Write the
content to a Markdown file, render a preview, and print it when I
ask.
The agent researches or creates the content. Slipbridge formats and prints it. No AI service or account is required by the local CLI.
Read results as JSON
Add --json to commands used by automation. Read
structured fields instead of parsing terminal text.
slipbridge print ./ticket.md \
  --printer tcp://epson-m30.local:9100 \
--paper 80mm --json| Print response field | Meaning |
|---|---|
ok |
Whether the command succeeded. |
printer.id |
The resolved printer address. |
job.id, job.state |
The job identifier and current state. |
driver.resolved |
The selected driver. |
Successful delivery means bytes were sent to the printer. It is not confirmation from a paper sensor.
Connect the web app
The Slipbridge web app provides reusable templates, a web interface, an HTTP API, webhooks, MCP integration, and visual print history. It prepares the content and manages the job. The workspace renders designed templates into complete PNGs. The CLI delivers them to the printer and reports the result.
Templates are evaluated in the web app. The CLI receives the
finished content to print. For local use, prepare a text,
Markdown, or image file with your own tool. Old
--template commands need finished content instead.
With access to a Slipbridge workspace, obtain a pairing code there, then pair and start the listener. Replace the code and server URL below with your instance's values.
slipbridge pair YOUR_PAIRING_CODE \
  --server https://app.slipbridge.com \
  --printer tcp://epson-m30.local:9100 \
  --paper 80mm

slipbridge listen
Leave the listener running on the printer's computer while you want to receive remote jobs.
Queued jobs
Normal print commands create a job and send it
immediately. Slipbridge serializes sends to the same printer so
concurrent requests don't mix their output.
To return before printing, use --enqueue. A queue
worker must then run to send the job.
slipbridge print ./ticket.md \
  --printer tcp://epson-m30.local:9100 \
  --paper 80mm --enqueue --json

slipbridge jobs run --once
Run slipbridge jobs run without --once to
keep processing local jobs. the Slipbridge web app jobs are handled
by slipbridge listen.
Inspect or cancel a job
List the jobs, then replace JOB_ID with the ID you
want to inspect or cancel. Cancellation applies to queued jobs.
slipbridge jobs list --json
slipbridge jobs inspect --job JOB_ID --json
slipbridge jobs cancel --job JOB_ID --json
Troubleshooting
The printer doesn't appear
Check power, cables, and that your computer is on the printer's
network. Run slipbridge doctor for USB access
problems. If you know the printer's IP address, use it directly,
for example --printer tcp://192.168.1.50:9100.
My print is too small or clipped
Match --paper 58mm or --paper 80mm to
the loaded roll. Render a PNG at that width and inspect it. The
output is monochrome, so choose images with clear contrast.
A job is queued but nothing prints
--enqueue saves a job without sending it. Run
slipbridge jobs run --once to process the queue, or
omit --enqueue to send directly. For jobs arriving
from the Slipbridge web app, run slipbridge listen.
The printer produces blank paper or strange characters
Confirm the printer supports ESC/POS and is set to the correct
command mode. A printer appearing in discovery does not
guarantee protocol compatibility. Use
slipbridge printers test --printer <printer-id>
to send a short test receipt.
How do I check the available commands?
Run slipbridge --help or add --help to
a command such as slipbridge print --help. The
installed CLI is the reference for its available flags.